Tuesday, June 14, 2011

An Accessory Trend for the Non-Commital

When it comes to trends, well, I'm not very trendy. I'm not the type of person who's willing to spend money on a new wardrobe because neons are "in" or to even splurge an extra $10 on the purse with ruffles because ruffles are all the rage right now. My closet is full of the basics...most of which are black because black goes with everything! But THIS trend is perfect because you don't have to worry about whether or not it will still be hip next season and it probably won't cost you a penny to try.

For a quick update to your look and a fun (but subtle) way to accessorize, all you need is two different nail polishes that compliment one another and a little free time! This new nail trend has been seen on a lot of the catwalks recently is definitely do-able for us non-catwalkers.


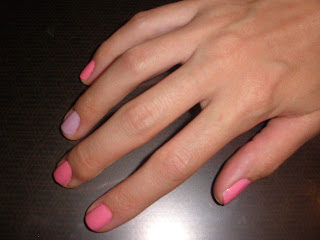
Testing out this trend couldn't be simpler. Just paint your nails with your primary color, leaving one nail unpainted. I like to paint my ring finger with the secondary color. Go back and paint the secondary color on your finger of choice. Apply a second coat if needed. That's it!


Get creative and try different combinations. 
Matte purple with metallic purple. 
Nude pink with red. 
Mint green and eggplant purple.
Coral and sunshiney yellow.
Robins egg blue and white. 


The sky's the limit!!!

Friday, May 27, 2011

Drawing Inspiration: Blossoming Crab Apple Trees

  I love the gorgeous colors of spring! One of my favorite spring sights are the blossoming crab apple trees. They transition from a snowy white to a deep flush of pink and I felt they were perfect inspiration for our next look!
 _______________________________________________________________

  First, as always, I primed my eye. I used Urban Decay Primer Potion.
Then, I applied a pale pink cream shadow from Revlon's Illuminance 'Twilight' Quad onto the inner half of my lid using my ring finger to blend it out.


   -----------------------------------------------------------------------------------------
Next, I used an angled shader brush to apply a white shadow (it can be either matte or shimmer) on the inner half of the lid - where I applied the cream shadow. I dusted this same shadow on my brow bone.


    -----------------------------------------------------------------------------------------
I then tapped a flat shader brush into a matte magenta shadow and applied this in the outer "V", starting along the outer half of my upper lash line then connecting up into the outer half of my crease. After, I pulled the color in the crease slightly upwards and out to soften it. Blend over all this gently with a fluffy brush.


    ------------------------------------------------------------------------------------
To add depth to the eyes, I picked up a small amount of a matte red on a pencil brush and applied this in the same "V" shape but kept this "V" smaller and inside the magenta.


   -------------------------------------------------------------------------------------
Using a purply-pink eye shadow and a fluffy brush, blend the space between the magenta and white to create a soft transition of color. This shadow can be matte or shimmer. I chose a shimmer because it adds light to the eyes.


   ---------------------------------------------------------------------------------------
For a twist, I used a deep violet shadow, applied wet with a liner brush, as a liner instead of the usual black. To do this, I just ran some water on the palm of my hand and picked up some of the water droplets with the brush. Then, I picked up some shadow. Easy!


    ---------------------------------------------------------------------------------
I finished this look off with mascara, a little black pencil liner along the outer lower lash line, a pale pink blush and then I lined my lips with NYX's "Dolly Pink", a magenta liner that I blended slightly inward from the edge of my lip line. I topped that with a shimmery pink gloss dabbed in the center of my lips.


You can make this look more wearable by skipping the red and using less of the magenta. And, of course, you can wear this with black liner! Just make sure to go bigger on the lashes to balance out the vivid color on the eyes.

Wednesday, May 11, 2011

Indecent Exposure: Spring & Summer Skin Care

Now that the weather is warming up we'll all be spending more time outside and that means greater exposure to the sun. Each of us has our own unique skin type but the one thing we all have in common is that we need to take care of our skin. In this post we'll discuss some of the trials that our skin may face during the spring and summer and how to ward off the ill effects of "indecent exposure".

Let's first go over some of the many skin ailments that can afflict us as a result of exposure to sun and chemicals.

Pool Chemicals
Like the drinking water that comes from our faucets, pool water has chemicals in it so that it is healthier for us to swim in. However, the concentration in pool water is much stronger than that of our drinking water. Pool chemicals, such as chlorine, are harsh and drying to our delicate skin. To keep your skin soft and healthy, shower your entire body and face. It also helps to use a loofah or a body scrub. And to combat the drying effects of these chemicals moisturize your skin regularly.

Water Safety
For those of you who enjoy swimming in the great outdoors, I recommend that you check the safety of the body of water you intend to swim in. Some bodies of water, though they may look pristine and ideal for a dip, may actually contain water born parasites that can give you less than appealing skin infections like Swimmers Itch. Little parasites that ride around on critters like snails and ducks can mistake you for dinner, leaving you with itchy, bumpy papules (sounds fun, right?).

MedicationBe sure to check all the medications you're taking before heading outside. Some medications make you prone to sunburn and other skin irritations.

Sun & Your Skin
Over the past decade, it has become increasing clear that bronzing ourselves beneath a hot summer sun and baking ourselves in tanning beds is a BIG NO-NO! But still, so many people ignore the ugly, cancerous truth in the pursuit of that golden glow. Do. Not. Neglect. Your. Skin. One day (about 10 years from now) you'll be kicking yourself in the butt.
"But I'm so pale!", you say.
"Better pale than dying of skin cancer!," I say.

So, what is a tan anyways???
I'll spare you the long, wordy version and put it as plainly as I can. UVA rays penetrate your skin and trigger the production of melanin. Melanin is what makes your skin appear darker. But this also signals that the UVA rays have had enough time to damage your skin and even your immune system.

Some other unpleasant side effects of sunning include:

Freckles: Freckles can be enhanced or brought on by sun exposure. They are not a sign of a health problem but are simply melanin in the skin.

Sunspots: These flat, brown spots (also called age or liver spots) are not cancerous but can be a sign that you've been neglecting your skin. They generally appear on older people who have freckles and those who have fair skin.

Wrinkles: We will all inevitably get lines and wrinkles as we age, but exposure to the sun and neglecting to take care of our skin only further slows the already slow process of cell division in our largest and most visible organ, the skin. To stave off those wrinkles you must avoid sun exposure and regularly moisturize your skin to aid in cell turnover.

Sunburn: This is the most immediate effect of overexposure and it's as painful as it is unsightly. A sunburn is actually a burn to living tissue. Besides causing redness, one can also feel hot to the touch in the burned area, general fatigue and dizziness. In the extreme cases a sunburn can be life threatening. Once you've been burned the only real cure is time...although aloe vera might help with the pain.

Protecting Yourself
Avoiding the suns rays is the first step to keeping your skin healthy. But, of course, the last thing we want to do is spend our summer hiding inside. So, when you do head out cover yourself. Clothing, like sunscreen, acts as a barrier against the sun's harmful rays. Light, flowing skirts protect your legs. Airy tunics and other wraps cover your upper body and a wide-brimmed hat keeps those UVA's and B's off of your face, shoulders and chest. But don't forget the sunscreen! SPF 15 is the minimum required to protect you from skin damage. Put it on 30 minutes before heading outside and, remember, you need to reapply every two hours and after swimming or sweating. This is because sunscreen only prolongs the amount of time before you become vulnerable to burning. Get a broad spectrum sunscreen (protects against both UVA and UVB rays).
UVA rays are responsible for Aging, while UVB rays are responsible for Burning. If you know that you're going to be in the sun for a long period of time, I suggest applying a higher SPF sunscreen so that you're protected the entire time or at least have to reapply less often. To make application easier, keep your sunscreen in the bathroom and incorporate it into your daily routine...like brushing your teeth. Also, look for lotions that contain a minimum SPF 15.And, last but not least, don't forget your SPF lip balm!

Thursday, April 21, 2011

Saving Face

I love looking my best...but I hate to part with my money! If you're like me, you're always trying to find good makeup for cheap. Well, I'll save you a little time and effort by sharing the places I find the best looking deals.

The Drugstore

So often you see beauty magazines, blogs and videos where all they talk about are the high-end beauty brands. MAC, Estee Lauder, Cargo, Benefit, Dior...the list goes on and on. But you can find dupes for most any of those pricey products in your local CVS, Walgreens or even Target and Walmart. To find duplicates of that lipstick that looks gorgeous but costs a small fortune just look on the good ole internet. Entering searches such as "MAC Dainty Cake lipstick dupe" or "Clinique blush dupe list" will reveal tons and tons of affordable alternatives to that $40 product you've been wanting.

Join the Club

How many times are you at the register paying when the cashier asks if you want to join their stores "reward program"? Most of the time we politely blow them off because we know that the "special members card" they want us to sign up for is actually a big rip-off. This is not the case with the beauty stores. Places like Ulta and Sephora (<-- my favorite!) have clubs that you can join to rack up points for every dollar spent in their stores. And you also get first dibs on new products and special "insider" deals by signing up for emails from them. The rules are straight forward and there's no catch.

Coupons

Yes. Coupons. For makeup. But you have to know where to look. Sites like Amazon.com and RetailMeNot.com are great places to find the makeup you want for less. eBates.com offers coupons on beauty products and cash back just by doing your on-line shopping through their website. Enter terms like "beauty", "makeup" or "cosmetics" into the search to find deals.

Buying On-line

While we're on the topic...shopping on-line has become more and more popular over the last few years. Not only can you find that summer dress on-line but you can also find all your beauty stuff on-line too. And often times the prices you find on-line are the same or cheaper than the prices you'll find in store. Plus, if you're favorite beauty store is 2 hours away...you save money on gas! Some great sites to check out are drugstore.com and its sister site, beauty.com. Before you buy ANYTHING check if you can buy it for less on-line!

Swapping

A newer trend in beautifying on a budget is swapping makeup. Websites like MakeupAlley.com are places where you can swap your new or barely-used beauty booty with others. To be honest, I think it's gross. I don't advise it because you don't really know what you're getting or where it's been. But, swapping unused makeup with people you know is a safe, wallet-friendly idea that I am okay with. We all end up buying something that we never even opened or you get a gift that isn't exactly your style. Swap it with your family and friends for the stuff they've never gotten around to using (and never will!). That colorful eyeshadow you regret buying is perfect for your niece or sister and the shade of foundation that you thought looked right when you saw it at the store is the same shade one of your friends wears.

Returns

Last, whenever I'm buying makeup products, I like to check the store policy on returns before I make a purchase. Some stores will take the product back and give you a full refund (with the receipt) if you find out you don't like your purchase. If you make a habit of buying from these stores when trying something new, you can save yourself the worry of wasting money if you absolutely hate the shade of red lipstick you bought.

Thursday, March 31, 2011

Drawing Inspiration: The First Red Robin of Spring

Although winter seems as though it may never end, I have hope that somewhere from beneath the snow spring will emerge because over the last couple of weeks I've spotted several robins. I thought that their cheerful orangey-red feathers served as great inspiration as we wait for the colors of spring to arrive. Here's my take on the first sign of spring!


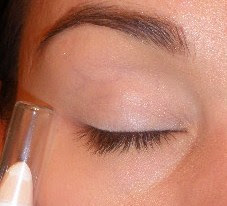
As always, prep the eye area with an eye primer. Next apply a white base to the lid area only. I used my NYX Jumbo Pencil in Milk. This will make the colors we use pop! I find you get a more even application if you apply this with your ring finger.

With a slanted flat brush or a clean finger apply a yellow-white shadow below your brow and in the inner corners of the eyes. This color is barely noticeable but draws light into the eyes.

Now, using a fluffy round brush and a skin toned shadow with an orange tint to it, brush on a layer of color from the lash line up to just below the brow. This step is to give that orange base that enhances the other orange hues and more importantly to create a layer of powder that makes blending other colors easier. If you don't have this shade just skip it!

Next, with a flat shader brush and a creamsicle orange shadow, pat on an even layer of color that covers the lid. The left over can be swiped along the lower lash line. This shadow should either be matte or satin finish, frosts will look too flashy.

To add dimension to the lid you can pat on a burnt orange on the outer and inner corners of the lid (without completely covering the inner eye highlight). If you don't have another darker orange color you can simply add another layer of the creamsicle orange or even a little touch of a light brown or soft red. A bit of bronzer can do the trick!

After that, with a fluffy blending brush, lightly layer on small amounts of a neutral/warm medium brown in the crease. When you get to the outer corner of the eye, instead of connecting the color to the outside corner of the lash line, sweep the brown up and out, leaving a space about the width of a pencil between the color and the outer corner of the lashes. Blend the brown and oranges into one another until the line is blurred slightly.

With a slanted liner brush and a dark warm toned brown, line the upper lash line and the outer 1/3 of the lower lash line. At the corner make a soft wing. Soften the top of the line gently with a Q-tip. Add black pencil to the waterline for an extra kick then put on a few coats of black mascara.


Finish with natural looking flush on the cheeks. I combined several powdered blushes to get the color I have and applied it with a jumbo cotton ball. Keep the lips warm but natural. I mixed up a soft rose lip color and topped it with a gloss that had a hint of shimmer to it. This look is soft but with a fresh pop of color that works for day as well as night. If you're trying to get into using colors more this is a good look to try!

Friday, March 18, 2011

Spring Cleaning and Shopping Your Makeup Collection

Spring is just around the corner and that means...dun dun duuuunnnnnn...spring cleaning.
But spring cleaning isn't just about cleaning house it's also the perfect time to clean up and clean out your beauty products.

First, make sure to regularly clean all your brushes and other beauty tools. This is sooo important to maintaining healthy skin. Plus, clean brushes means better makeup application. If you haven't already, read my post on the importance of sanitizing your kit.

Next, you need to discard any products that are expired. How do you know if something's expired?
The rule of thumb: Toss powder products, such as eyeshadows, powder blush, face powders and brow powders, that you opened more than 2 years ago. Toss cream products, like cream or liquid foundations, cream shadows and lipsticks, after they've been open 1 year. To make this process easier for next year, write the date that you open a product on the bottom of the container in permanent marker!

And last, here's a fun way to rediscover your makeup collection! Survey your entire kit. Separate your makeup into two piles. In the first pile place all the items you regularly use: your go-to eyeshadows, the blush you use every single day and that lip gloss you use all the time. In the other pile put all the makeup you don't routinely use: the lipstick you got as a stocking stuffer, the eye liner that's migrated to the bottom of your bag and the eyeshadow you bought but never seem to wear. Put the items in the first pile in a bag, drawer or other container out of sight. Use only the items from the "neglected products" pile for a set time...say...a week or a month. By shopping the makeup you already have you rediscover your makeup and refresh your beauty routine without spending a penny!

Thursday, February 17, 2011

The Best Fix for Dry Hands is...


...olive oil! The same thing you use to whip up a delicious dinner can be used to whip your skin back into shape before summer gets here. It's a natural cleanser and moisturizer minus all the harsh and unnecessary chemicals that brand name lotions contain...and it's cheap. You can also use other oils such as grapeseed and coconut (although they're more expensive) and even fish oil. I'd suggest staying away from things like peanut and vegetable oil because you'll end up smelling like a french fry.

For dry hands apply a few drops (about 5) to your hands and rub, rub, rub. I like to do this at night right before bed. Don't forget to massage it into your cuticles. You can even keep some in a pretty little pump on your nightstand!

If you have dry skin on your face from enjoying the slopes rub 1 - 3 drops onto your cheeks and lips. If you have sensitive, acne prone skin you should exercise caution before trying this by testing on a small patch of skin on your jawline.

To get your tootsies ready for sandals, rub a several drops onto each foot. Massage it in until absorbed and then put on some socks to ensure your feet get all that moisture...and so that you don't wipe out in the kitchen!

You can also use olive oil to moisturize dry elbows and rough knees. And adding a touch of olive oil to the center of your legs - on the shin bone - adds definition and makes your legs look slimmer. A great trick when wearing skirts or shorts!

For a homemade body scrub mix 1/2 cup olive oil with either salt, sugar or brown sugar. Add enough salt, sugar, brown sugar to achieve the consistency you like, then if you want, add a few drops of essential oil (lavender, vanilla, chamomile, ginger root, anything yummy smelling) and you've got a fantastic body scrub without spending $20. Keep it in an airtight container in the fridge and it'll last you just as long.

If you have the time for a relaxing soak in the tub, drizzle a small amount in the bath.

Suffering from dried out, frizzy hair? Use olive oil as a conditioner. Wrap your hair in a plastic bag and then a warm towel. Let it soak in for 10 - 20 minutes.

 Try out these different uses for olive oil and you'll emerge from your winter hibernation looking radiant!

Friday, February 11, 2011

Rusted Smokey Eye for Valentine's Day

This second Valentine's inspired look uses only colors from the EDUN for Sephora Makeup Palette #1 (unfortunately I think it's been discontinued). All of these shadows have shimmer in them so please excuse the super shimmery pictures. If you don't have this palette - don't worry - all you need is a gold shadow with reflects in it, a shimmery pink, a rusty red and a chestnut brown shadow. Follow the steps below to create a romantic smoked out eye that's sure to catch someone's eye!

As always, prime your eye for staying power. Lay down the first color, a glittering gold, on the inner half of the upper lid. Make sure to tap as you don't want sparklies all over your face!

Next, with a fluffy brush, pick up the pink shade (right side, middle) and lightly pat this onto the lid. Start at the outer corner and work in so that it fades into the gold. Then blend the color up onto the brow bone.

Now, layer on small amounts of the rusty red shadow, applying it on the outer half of the lid. Imagine a diamond shape that's laying on its side following the lash line. Blend the colors lightly into one another using the fluffy brush. Use what's left on the pencil brush and apply it to the outer half of the lower lash line.

With the chestnut brown (lower right) and a pencil brush, pat the shadow along the lash line first. Then bring the color up into the outer most corner of the socket. Pull the color lightly across the lid from the outside toward the middle. Blend with the fluffy brush.

Next, with a black eye pencil, push the color in between the upper and lower lashes. This line should be undefined and smokey. Line your waterline with the black pencil. Curl lashes and apply a few coats of black mascara.

I used the blush (a baby pink with gold shimmer) from the palette. Lined my lips with a nude-brown liner, then applied a nude pink lip color topped with a golden gloss.

Thursday, February 10, 2011

Pink Pin-Up Eyes for Valentine's Day

This is a very fresh, fun look for Valentine's Day that only uses two colors (three if you count the brow highlight) with a pretty winged liner. Use any two shades of pink that you like, just make sure you don't skip the liner. If you don't create a line between your eyes and the pink shadow your eyes will look irritated instead of irresistible.

Start with a primed eyes. Eye primer will make the color last until after dessert! Next apply a light pink to the inner corner with a blending brush and then sweep it up across the brow bone. Feel free to use a shadow with shimmer if you like. I used a mauvey pink blush.

With a flat shadow brush, pat a brighter/darker pink onto the lid starting in the center of the lid and then blending out and up slightly onto the brow bone. Lightly tap the darker pink onto the light pink to fade the two colors into one another.

Now, using a liner brush, apply a matte black shadow along the lash line. This should be thick and the edge ever so slightly softened.

Next apply a black liquid or gel liner that follows the black shadow. You should leave some of the black shadow peaking out from beneath the liner. This creates a softened but still defined line and makes your lashes look really full!

Finish with a bone colored brow highlight or just leave it au naturale and a thin line of black shadow along the lower lashes and mascara. I paired this with a nude-pink lip color topped with a pink shimmery gloss. But this look would do well with a more rosey pink or even berry pink lip too. On my cheeks I kept with the pink theme but used only a minimal dusting of color.


Saturday, February 5, 2011

Game Day Makeup! GO PACK!!!!!

You KNOW I had to do it!

If you want to show a little extra team spirit then follow the tutorial below. Use any greens and yellows that you want. And...no...I will not be making a Steelers makeup tutorial. GREEN AND GOLD!!!!

First, apply an eye primer. I used Urban Decay's Primer Potion. Then, with apply a white base along the lash line and lightly blend, using your ring finger. The white will help the colors to show up better and more true than if you put it directly onto the skin.


Place a small piece of Scotch tape at the outer corner of your eye, following the curve of your lower lash line.


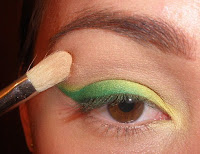
Next, with a pencil brush, apply a vivid yellow shadow to the inner half of your upper lash line and along the tear duct. Keep the color near to the lash line.


With the same pencil brush, pat a bright green on the outer half of the upper lash line. Again, make sure to keep the color close to the lashes.


With a light yellow, create a gradation from the yellow into the green. Starting at the inner corner then moving into the green, use small movements to blend out the edges. Do the same to the top edge of the green until any harsh edges have been blended away. I recommend using a small flat brush to do this. Use the yellow that remains on the brush and run it along the lower inner lash line. With the brush you used for the green shadow, apply what's left to the lower outer lash line. Blend the two into one another.


Remove the tape. Fill in your brows then apply a skin-toned shadow to the brow bone and around the edges of all the eye makeup. Use a black liner (liquid or gel is best) to create a smooth line that follows the green shadow. Apply several coats of black mascara and - if you want - false lashes.


Pair this spirited look with lightly blushed cheeks and natural lips.