Saturday, February 5, 2011

Game Day Makeup! GO PACK!!!!!

You KNOW I had to do it!

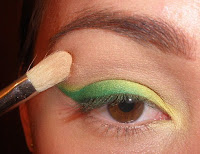
If you want to show a little extra team spirit then follow the tutorial below. Use any greens and yellows that you want. And...no...I will not be making a Steelers makeup tutorial. GREEN AND GOLD!!!!

First, apply an eye primer. I used Urban Decay's Primer Potion. Then, with apply a white base along the lash line and lightly blend, using your ring finger. The white will help the colors to show up better and more true than if you put it directly onto the skin.


Place a small piece of Scotch tape at the outer corner of your eye, following the curve of your lower lash line.


Next, with a pencil brush, apply a vivid yellow shadow to the inner half of your upper lash line and along the tear duct. Keep the color near to the lash line.


With the same pencil brush, pat a bright green on the outer half of the upper lash line. Again, make sure to keep the color close to the lashes.


With a light yellow, create a gradation from the yellow into the green. Starting at the inner corner then moving into the green, use small movements to blend out the edges. Do the same to the top edge of the green until any harsh edges have been blended away. I recommend using a small flat brush to do this. Use the yellow that remains on the brush and run it along the lower inner lash line. With the brush you used for the green shadow, apply what's left to the lower outer lash line. Blend the two into one another.


Remove the tape. Fill in your brows then apply a skin-toned shadow to the brow bone and around the edges of all the eye makeup. Use a black liner (liquid or gel is best) to create a smooth line that follows the green shadow. Apply several coats of black mascara and - if you want - false lashes.


Pair this spirited look with lightly blushed cheeks and natural lips.

Thursday, February 3, 2011

Product Review: Hard Candy Ginormous Lash Volumizing Mascara in Purple Haze

     I decided to purchase a colored mascara...something I've been wanting to try for quite some time now. Wearing a colored mascara is a simple way to re-vamp your routine and it subtly enhances your eye color. I was determined to find a drugstore brand as the high-end versions such as Urban Decay's Big Fatty's  ($17) and Benefit's BADgal Plum Mascara ($19) were more than I wanted to spend on something that I'd potentially be stuck with for the next 3 months if I didn't like it. The first thing I noticed as I scoured the cosmetics aisle at my local Walgreens and Wal*Mart was that color mascaras are rather scarce. In a sea of Classic Blacks, Blackest Blacks and Carbon Blacks were only a few colored mascaras to be found. Almay has a line of eye makeup that is designed specifically for enhancing eye color but other than that I was hard pressed to find a good selection of formulas and colors. I decided I'd try Hard Candy's Ginormous Lash Volumizing Mascara in Purple Haze. Here are my thoughts...

Packaging: The packaging of this mascara is ultimately what made me choose it over my other (meager) options as well as the fact that I'd never tried this brand before. The design is very girly, with swirls and hearts on a chromey purple background, and I liked it so much I set it out with all my pretty perfume bottles that I use as decoration in the bathroom.

Formulation: This mascara was not too thin or too thick in my opinion. Not too wet or too dry. It didn't end up all over my eyelid nor did it feel like I was trying to apply rubber glue to my lashes. I was very pleased with the consistency of this mascara, which surprised me because usually I have to leave my brand new mascara's opened just a twist to let them dry out a bit. It's also animal friendly!

Scent: It smelled the same as most do. Not nice...but not offensive.

Application: After I purchased this mascara, I drove home imagining what it would look like as I opened it; the deep, rich plummy purple that would transform my lashes from merely hairs protecting my eyes to jewel-toned plumes like that of a peacock. I was surprised to find that this was instead more of a bright lavender. When I applied it my lashes actually appeared lighter and less noticeable. It was very difficult to discern any purple color on my lashes, even as I practically pressed my nose to the mirror. There was a purpleishness (I made up a word) to my eyes - almost like an intangible aura - but not what I was hoping for. I tried applying the mascara both alone and over a black mascara, but neither yielded the color pay off I was expecting. However, I must say that this mascara does an amazing job at lengthening your lashes! My fringe was longer than with any other mascara I've ever used and the formula was so easy to build up. If the color had been a deeper, darker purple my lashes would've looked truly plume-like. (insert peacock sounds) The wand had a full spiral brush that made it easy to separate and lengthen the lashes and I was able to control the application of the product.

Longevity: Hard Candy's mascara held up all day and didn't flake or smudge. It kept the curl too!

Price/Quantity: This mascara will cost between $4.50 - $8.00 depending on your location. It can be purchased at Wal*Mart and online. The container holds 0.44 oz (12.6 g). It comes in 6 colors: Silver, Bronze, Electric Blue, Black Out, Carbon Black and Purple Haze.

Shelf Life: 3 months


IF YOU ASK ME

Color mascaras are fun to wear but need to be deep jewel tones in order for them to be wearable for every day. This mascara really hit the mark on longevity, ease of application and building length but was a disappointment in the color department. Maybe you'll get better color pay off if you have blond or light brown eye lashes but if you have dark brown or black lashes this particular one will only make them look lighter. I'll be using this mascara as a base before applying my usual black mascara to add length but I won't be buying this product again.


Sunday, January 30, 2011

Beautiful Stains

      Lip and cheek stains are quickly becoming a staple beauty item in makeup bags everywhere...and for good reason. This versatile, easy to use beauty product makes getting that perfect flushed cheek or natural berry stained pout super simple. Stains come in varying forms including gels, liquids, sticks and even crayons. The formulas for stains have improved a great deal since they first debuted and are much less drying than when they initially hit the market. You can also find them in a wide range of prices and colors that are sure to suit your budget and style.
     The beauty of a duo stain is that it's killing two birds with one stone so to speak - so it saves space in that overflowing purse you lug around. Plus, it's ideal for quickly achieving a totally natural glow without brushes. My current favorite is Sephora's Lush Flush in Red Wine which is an excellent dupe for Benefit's Benetint. Plus, it's half the price!!! If you don't mind spending a little more on such a multifaceted makeup addition then try Stila's Raspberry Crush Lip & Cheek Stain or Benefit's Posietint, which is probably the most popular stain out there right now. And there's Josie Maran's Magic Marker Stain in Jive would transition wonderfully from winter and on into spring and summer. In drugstores you won't find very many stains that are designed for both lips AND cheeks, however, check out Revlon's Just Bitten Collection and Mayebelline's Color Sensational Lipstain's. They are two cosmetics companies that have created great lip stains that last and won't dry out your pucker. When choosing a stain keep in mind that the color you see in the container will not be the same one you'll get once you put it on, so don't be afraid to go for the bright berries and cherry reds!

How to Use Lip & Cheek Stains

1.) You'll need to start with a clean face and lips that have been moisturized. Stains will cling to dry, flaky skin on the face and lips and we don't want that!

2.) Once your moisturizer has set in apply your color. When applying a stain the key is to move quickly. Tap the stain onto cheeks and lips either directly or onto fingertips first then tap and blend in gently. Build up the color until you get the desired color pay off.

 Of course, if you already have a favorite lipstick, some tissue and some lip balm you can accomplish the post-Popsicle lip and the just-ran-a-mile flush without a trip to the cosmetics counter...and I'll tell you how. A clean face and lips with moisturizer is still a must so don't skip that step.

For Cheeks: Dab your lipstick of choice (coral, berry, you name it) onto your ring finger. Then tapping and blending, apply to the apples of the cheeks.

For Lips: Apply a light layer of lip stick to your lips, then blot firmly with a tissue. Top with a lip balm to lock in moisture and you're done.

Tip: Stains also make great bases for powder blushes and lip sticks and glosses, so don't be afraid to top with your favorite coral blush or your go-to mauve lip stick. As the day wears on your blushes and lip colors will stay better longer.